Are you looking for some fun and easy Christmas craft ideas? Decorate your home in an affordable and unique way and keep the kids busy with these five fun and trending Xmas craft ideas to make over the holidays. Even if you don’t pride yourself on your DIY skills or you’ve never made Christmas crafts before, fear not, our easy-to-follow instructions will keep you on the right track.
Fun and easy Christmas crafts to make at home
1. Embossed foil decorations
Clik here to view.

You will need:
- Aluminium embossing foil
- Template of preferred decoration
- Scissors
- Craft mat or foam mousepad
- Pencil or embossing tool
- Nail polish
- One-hole punch
- Cord
Clik here to view.

Method:
- Using a template, trace the outline of your chosen shape onto the aluminium embossing foil with a pencil or embossing tool. Put a craft mat or foam rubber mousepad underneath.
- Cut out the foil pattern with scissors. Using the pencil or embossing tool, carefully make the patterns.
- Using metallic nail polish, highlight any features you want to stand out (Note: this can be optional if preferred).
- Make a hole at the top of the ornament using a one-hole punch. Thread some cord through and knot.
2. Homemade paper wreath
Clik here to view.
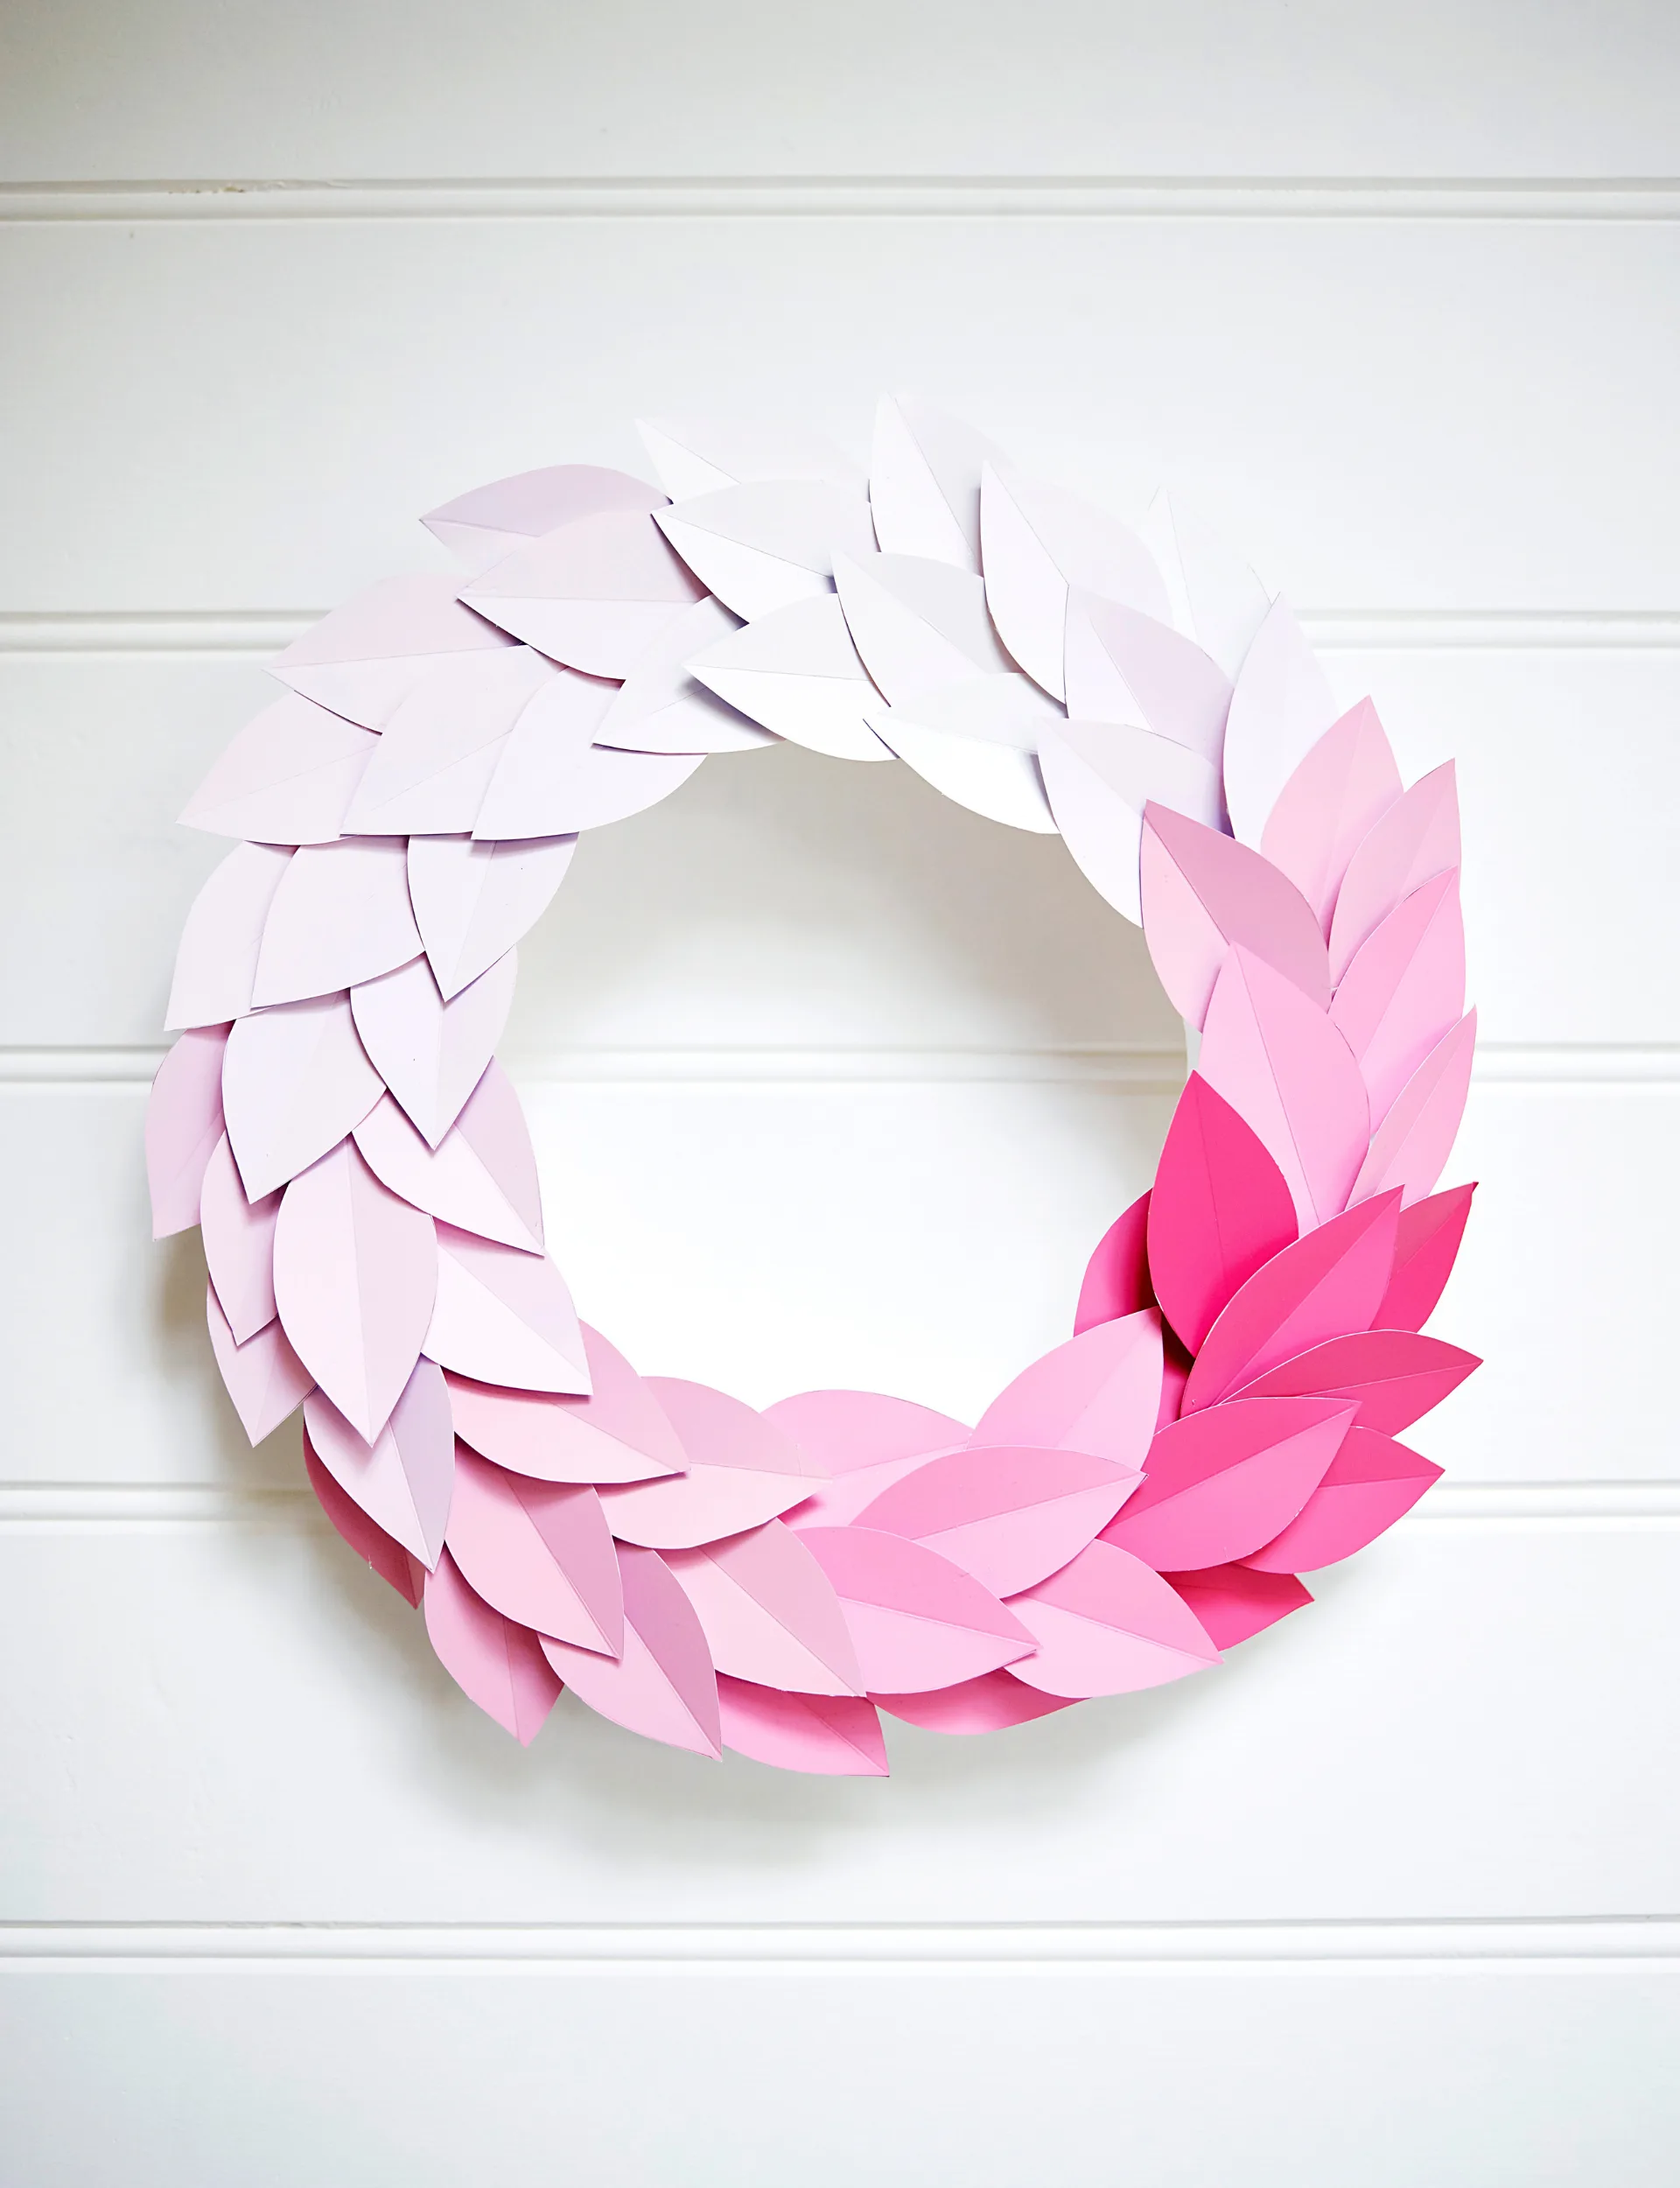
You will need:
- Cardboard, pencil and scissors
- Foam wreath – we purchased ours from Spotlight
- Coloured paper or card in different shades
- Craft glue and brush or hot-glue gun
Clik here to view.
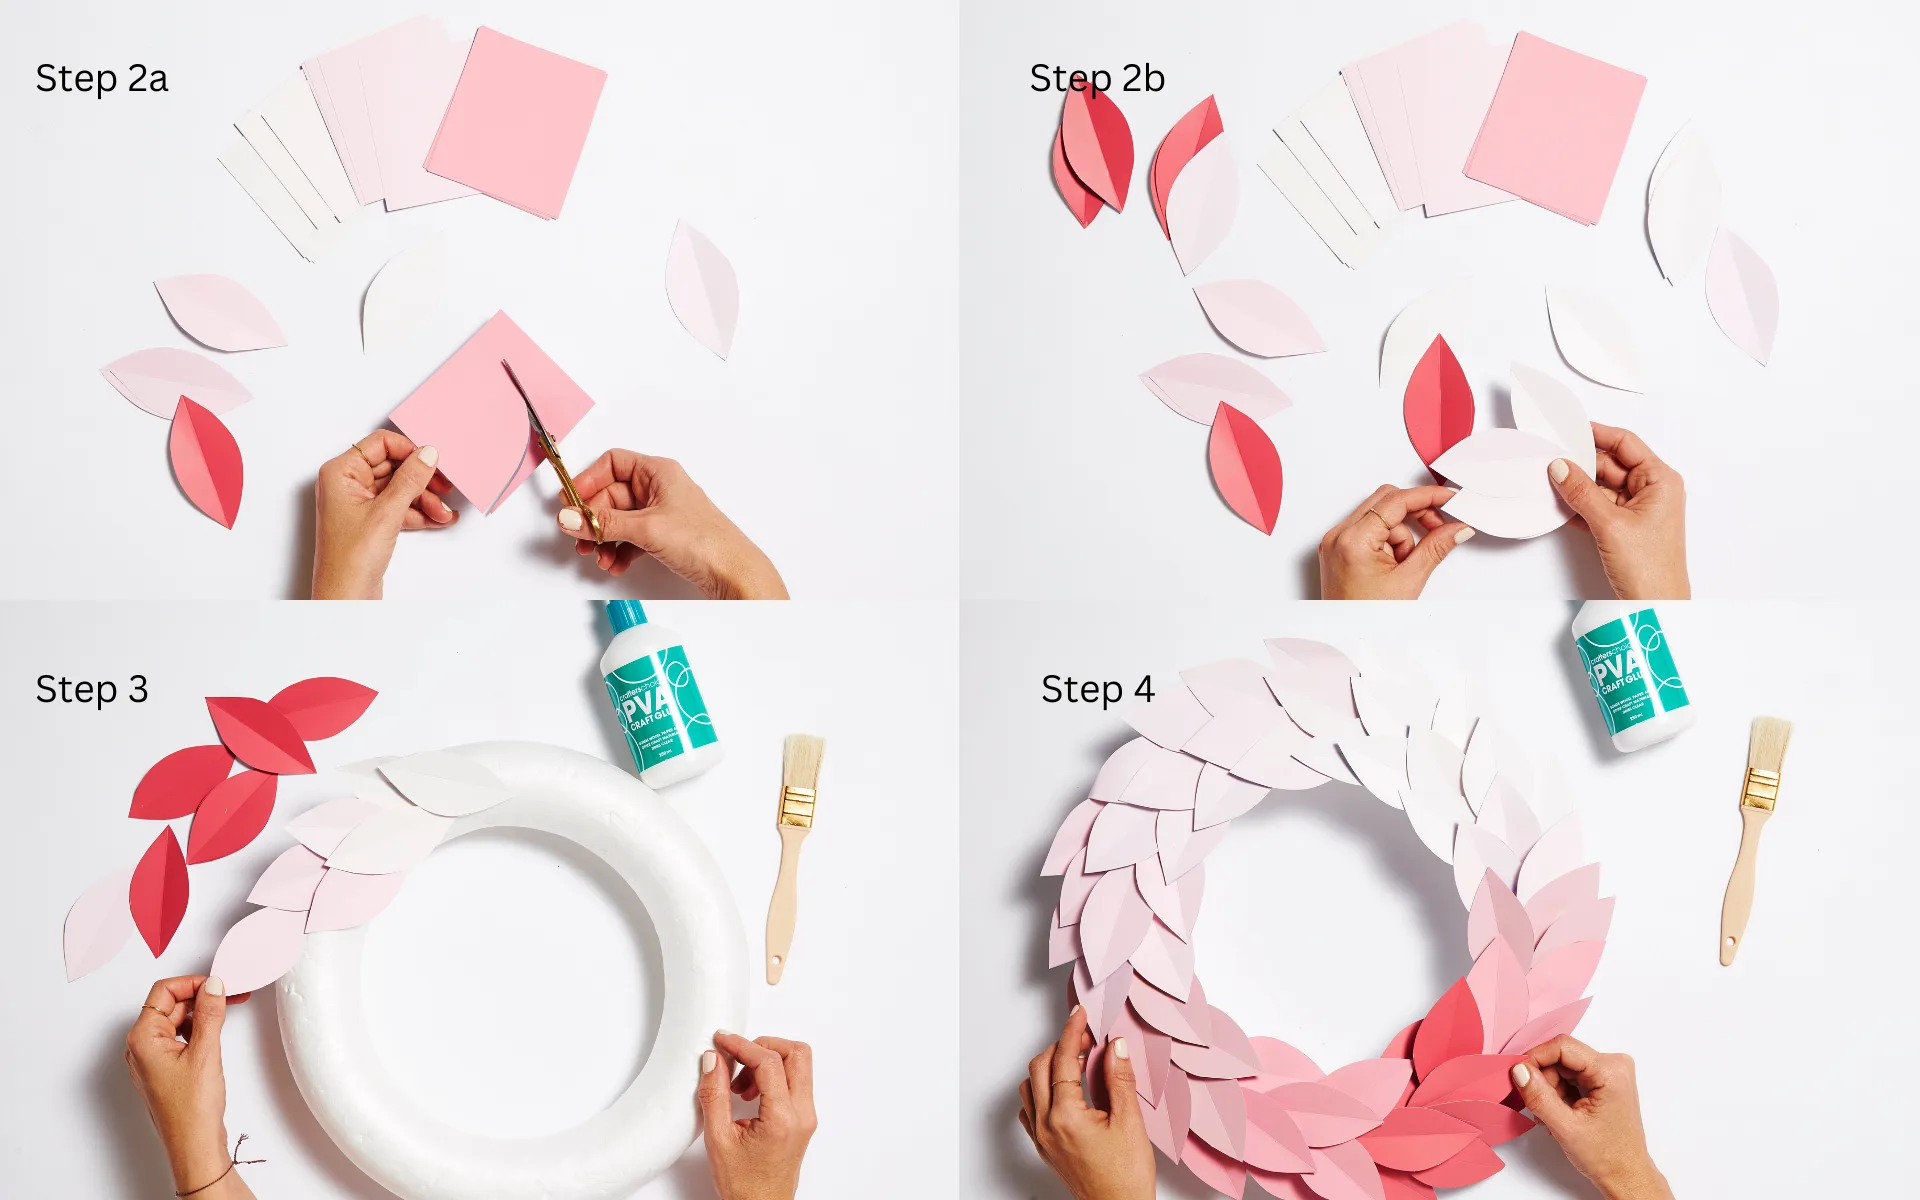
Method:
- Draw a single leaf shape onto a piece of cardboard. Cut the leaf out and make sure it’s the right scale against the foam wreath. This is your leaf template.
- Using the leaf template (a), cut out leaves in each of the different shades – you should have 80 leaves in total. Fold each in half to form a spine on the leaf (b).
- Glue the leaves directly onto the foam wreath, overlapping them. Once you have attached eight in the same shade, move onto the next shade.
- Repeat this process until you have worked your way around the wreath. Leave to dry.
3. Origami star decorations
Clik here to view.

You will need:
- Cardboard or paper, cut into squares
- Cotton or fishing line, for hanging – we purchased ours from Spotlight
Clik here to view.
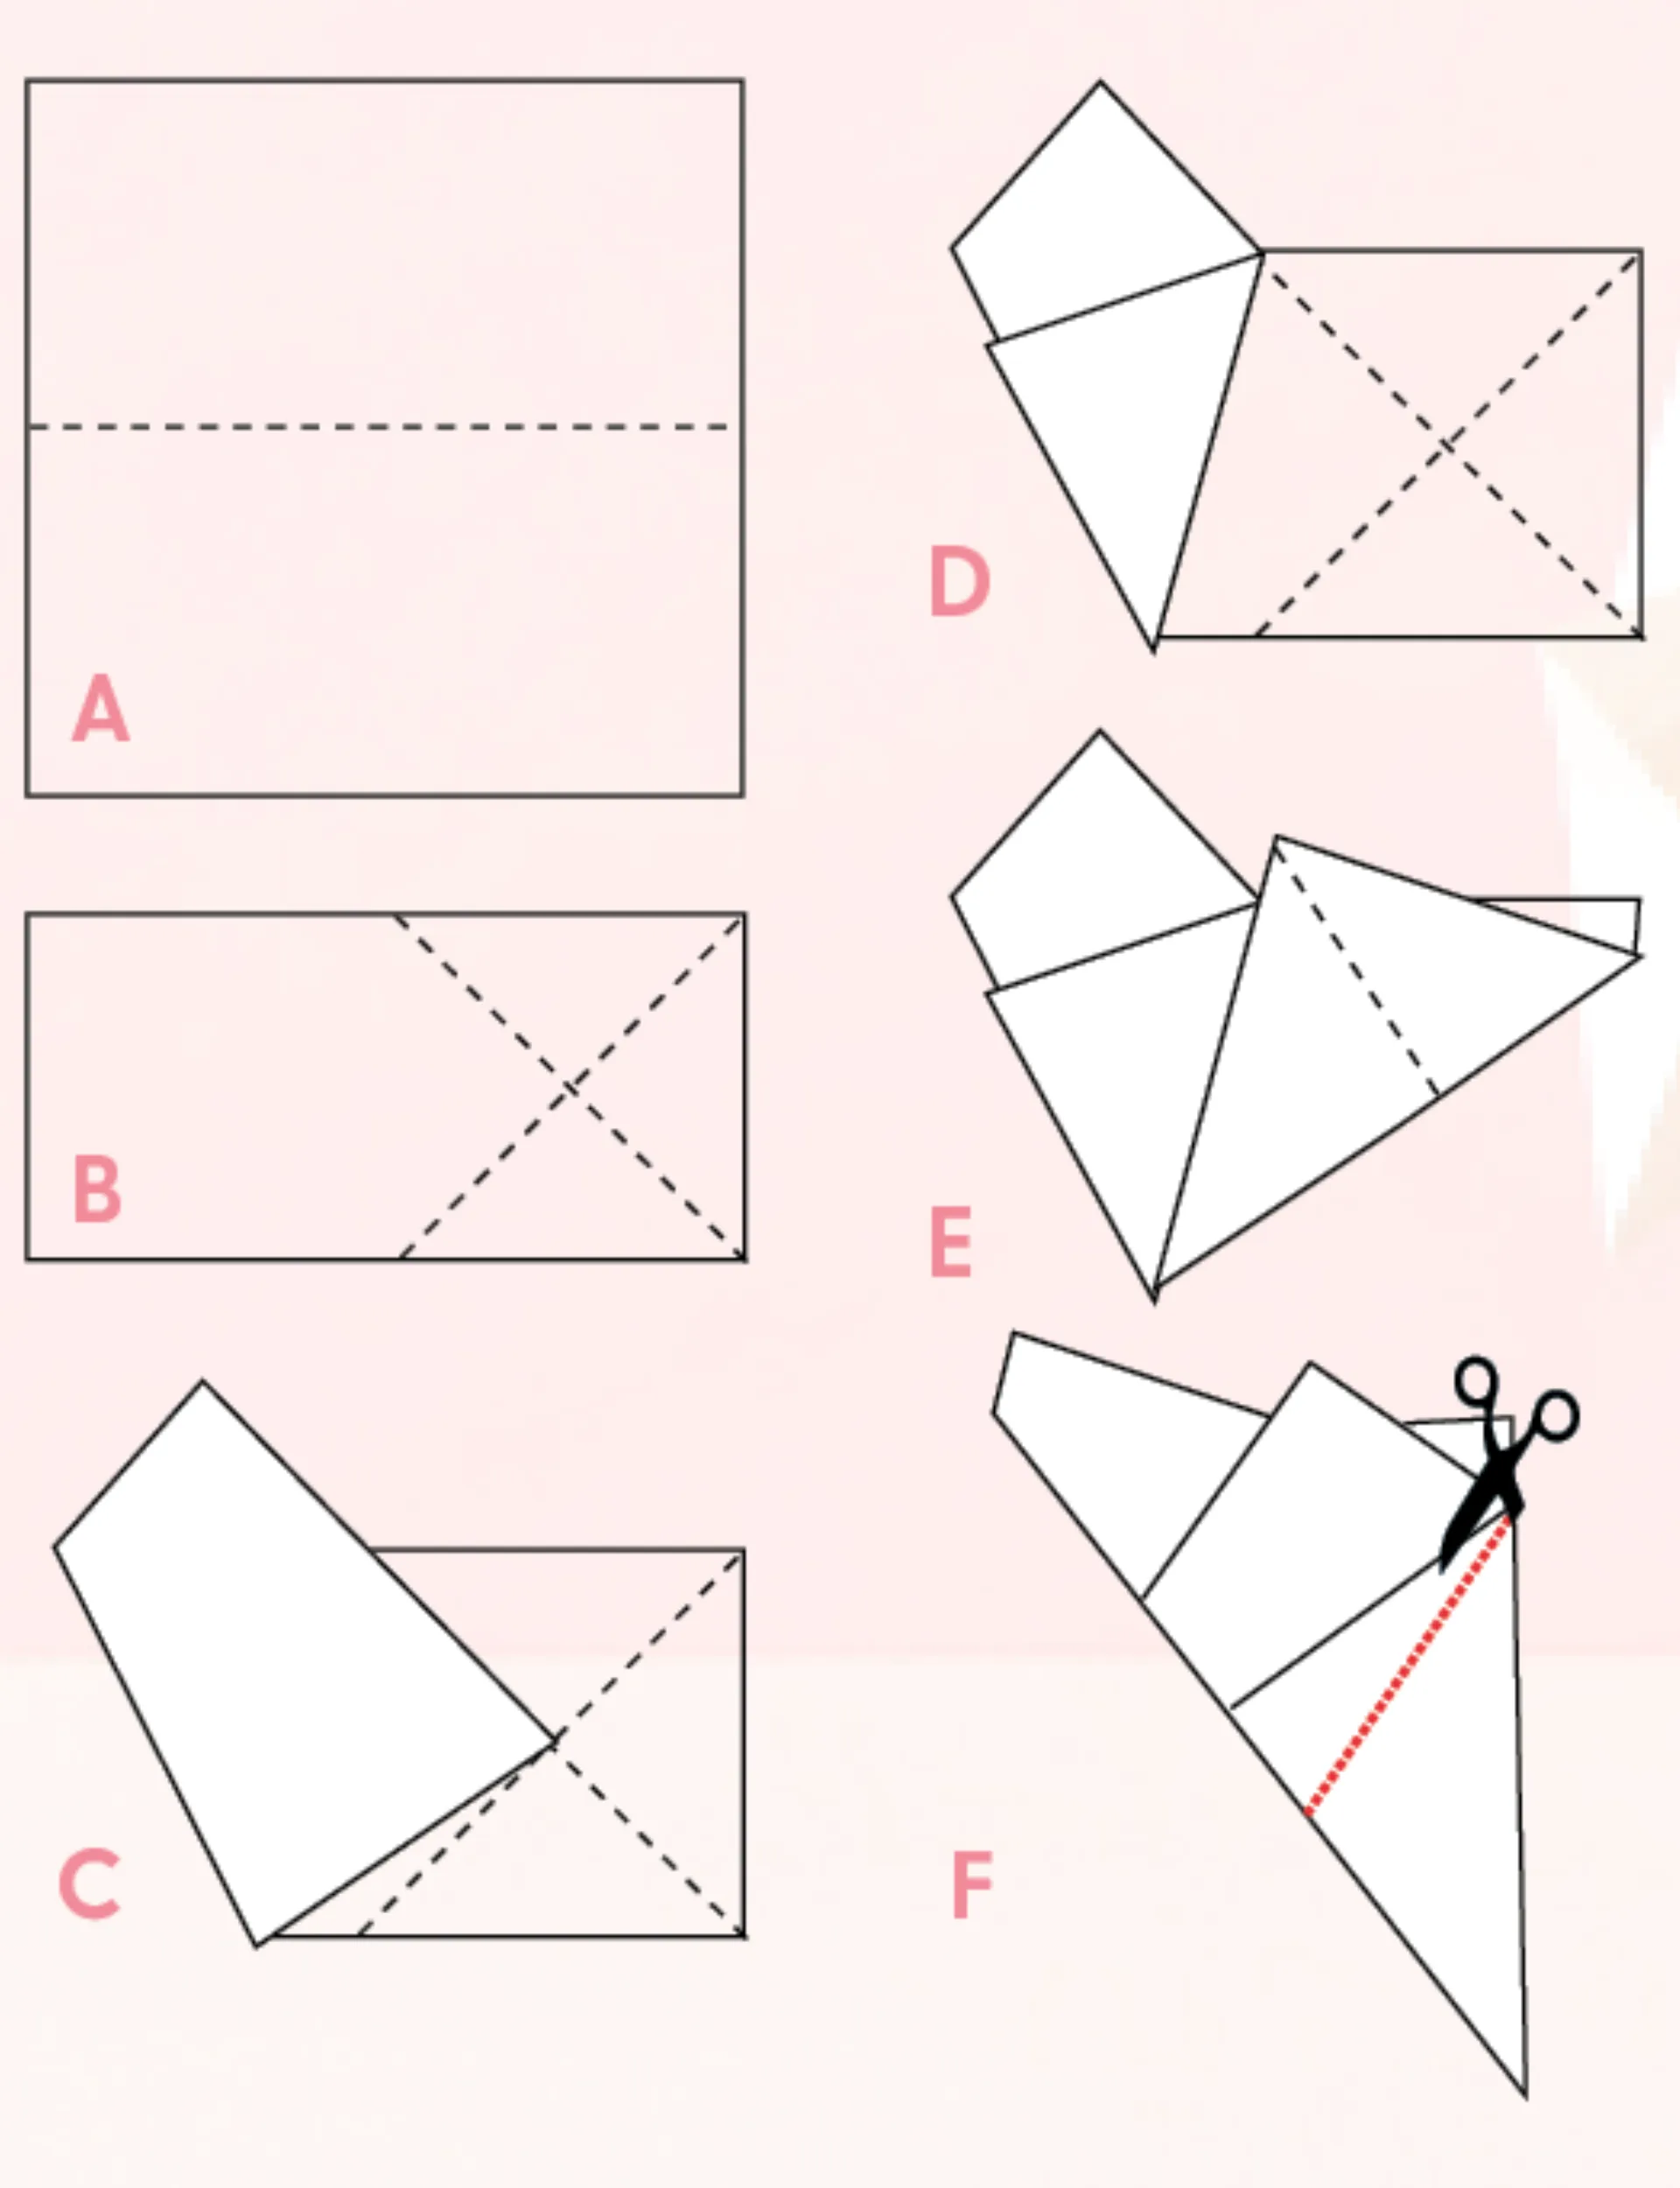
Method:
- Fold the square in half horizontally, then fold it into a smaller square. Unfold back into a rectangle ensuring the opening is at the top, and fold at the bottom. (a)
- Fold the bottom left corner to top centre. Unfold. Fold top left comer to bottom centre. Unfold. (b)
- Fold the top left corner across to meet the centre diagonal crease on the left half (c) and fold to meet the left edge (making a kite shape with that half). (d)
- Fold the right corner to the centre fold. (e)
- Flip over your paper and fold right over left so the kite shape is sitting in front.
- Use scissors to cut at the angle shown in the diagram (red line). (f)
- Unfold shape and refold creases (long folds up, short folds inner).
- String together with a fishing line and suspend over the Christmas table.
4. Christmas tree heart ornaments
Clik here to view.
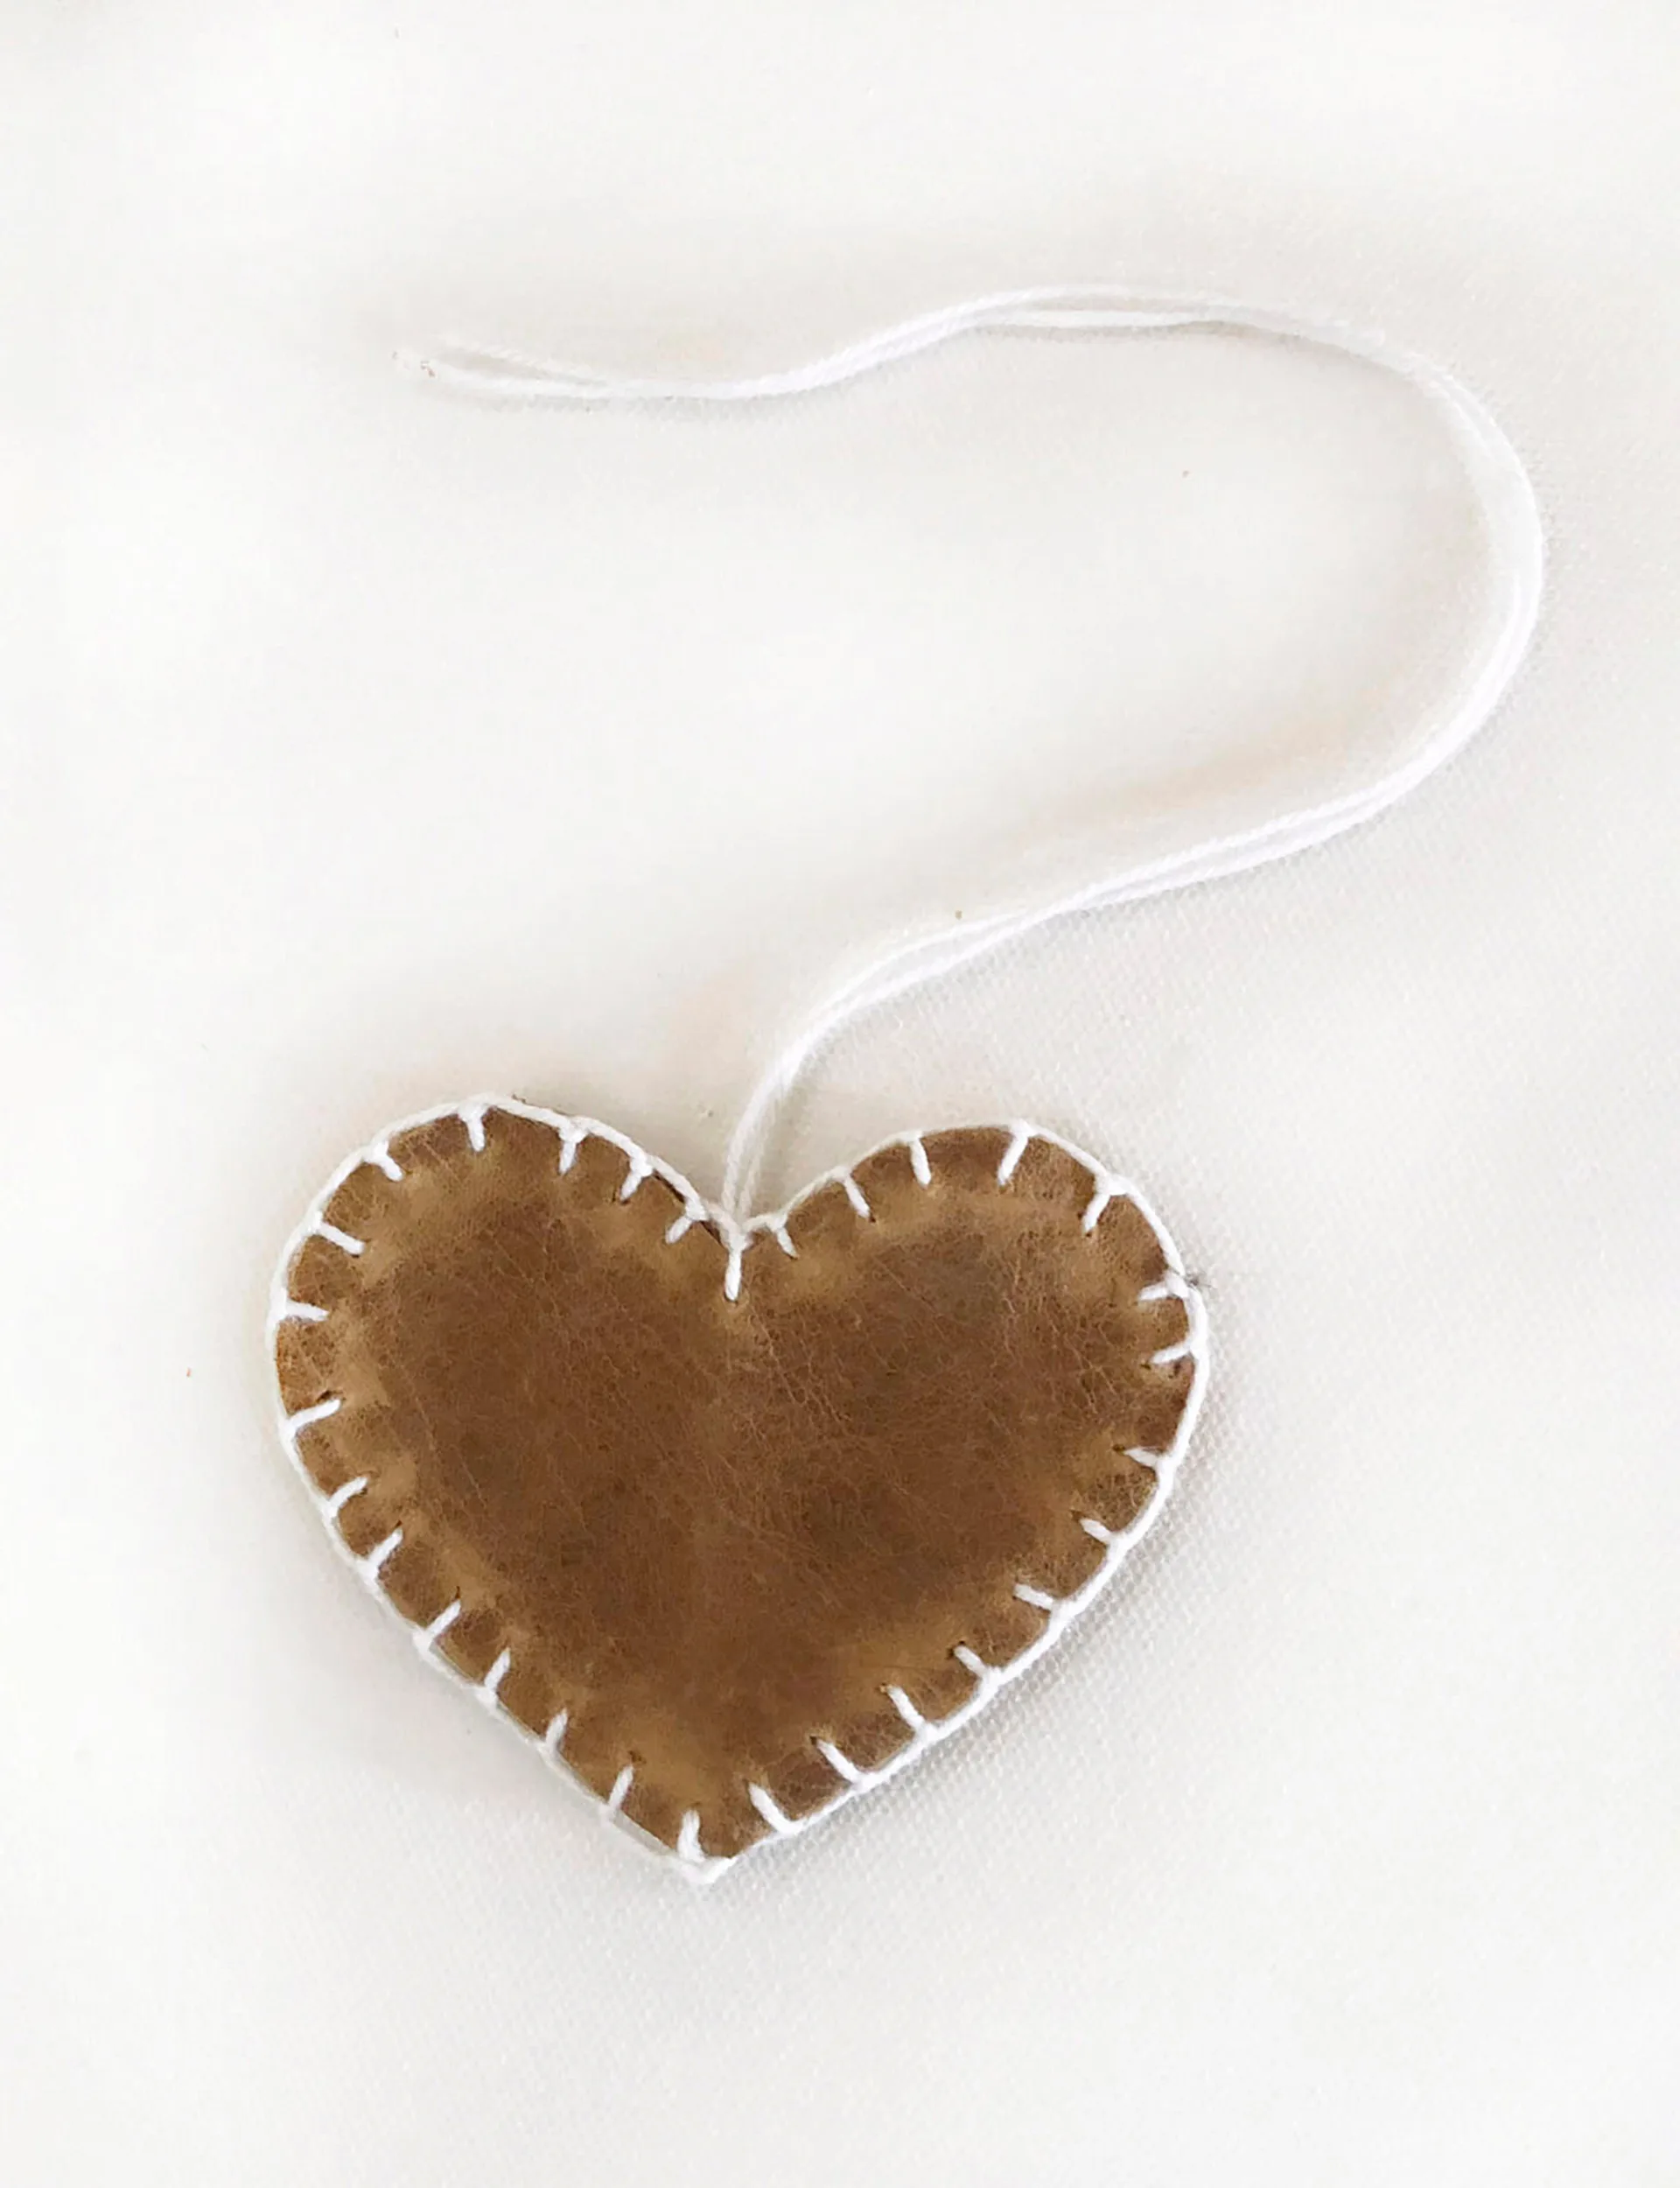
You will need:
- Scrap pieces of leather (not too thick) from fabric stores
- Ruler, pen or pencil
- Scissors
- White embroidery thread
- Embroidery needle
- Pin nail and hammer
- Scrap piece of timber
Clik here to view.
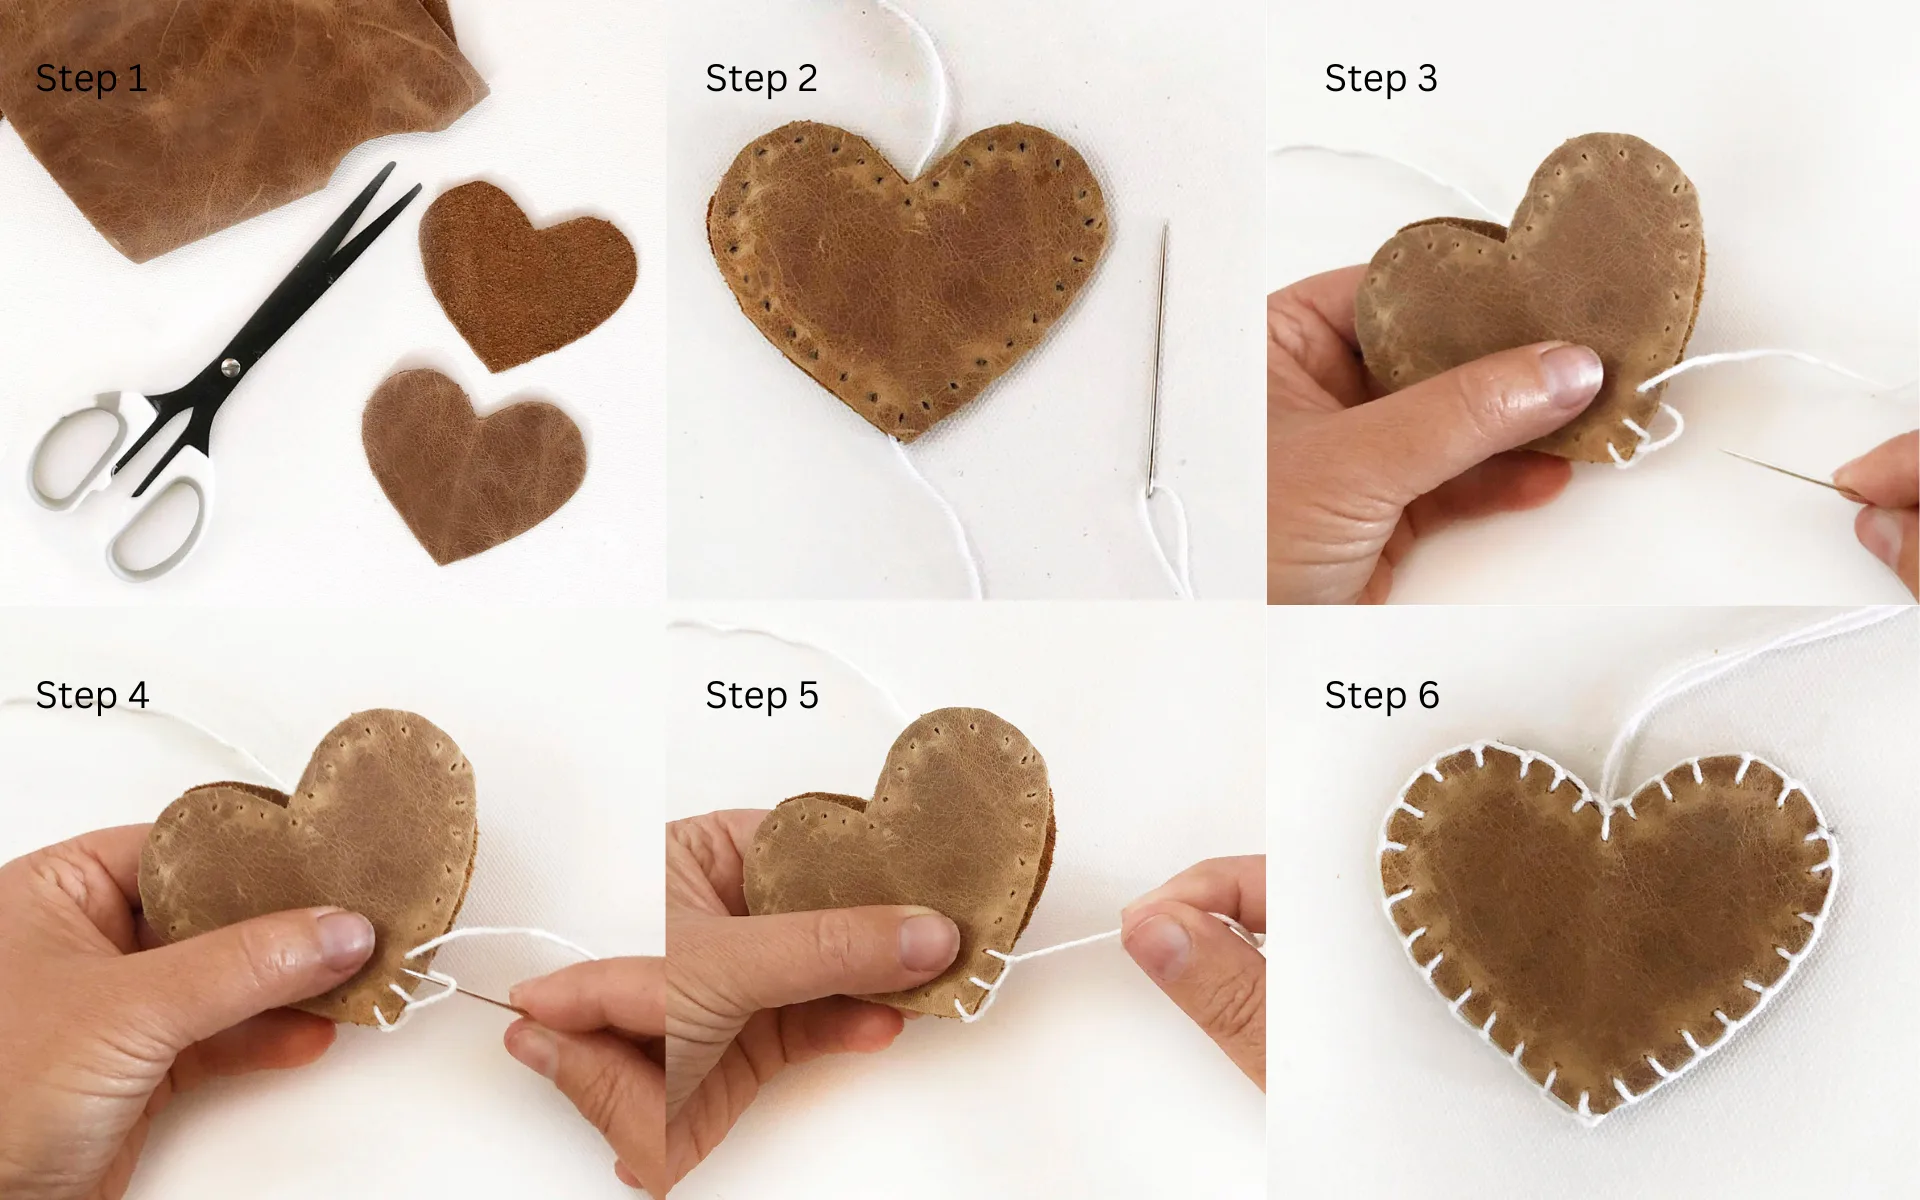
Method:
- Cut out two hearts the same size – you can make them as big as you like. Place them evenly together with the wrong sides facing each other.
- Use a piece of timber, a small pin nail and a hammer to punch small holes about 5mm apart and 5mm in from the edge all the way around. This makes sewing a lot easier and more accurate.
- Use a long length of embroidery thread to sew the hearts together. Start by leaving approximately 15cm of the thread end at the top centre of the heart; run the thread between the two pieces to the bottom point of the heart (2).
- Begin to stitch from the bottom of the heart, threading from the underneath side through to the front. Use a blanket stitch to join the pieces together.
- Stitch all the way around until you are back at the base of the heart.
- Push the needle back up between the two layers of leather, so you have two pieces of thread at the top for tying.
You can purchase small pieces of inexpensive scrap leather from craft or fabric stores and use them to make loads of little ornaments. We made this heart using less than an A4-sized piece of leather.
5. DIY advent calendar
Clik here to view.
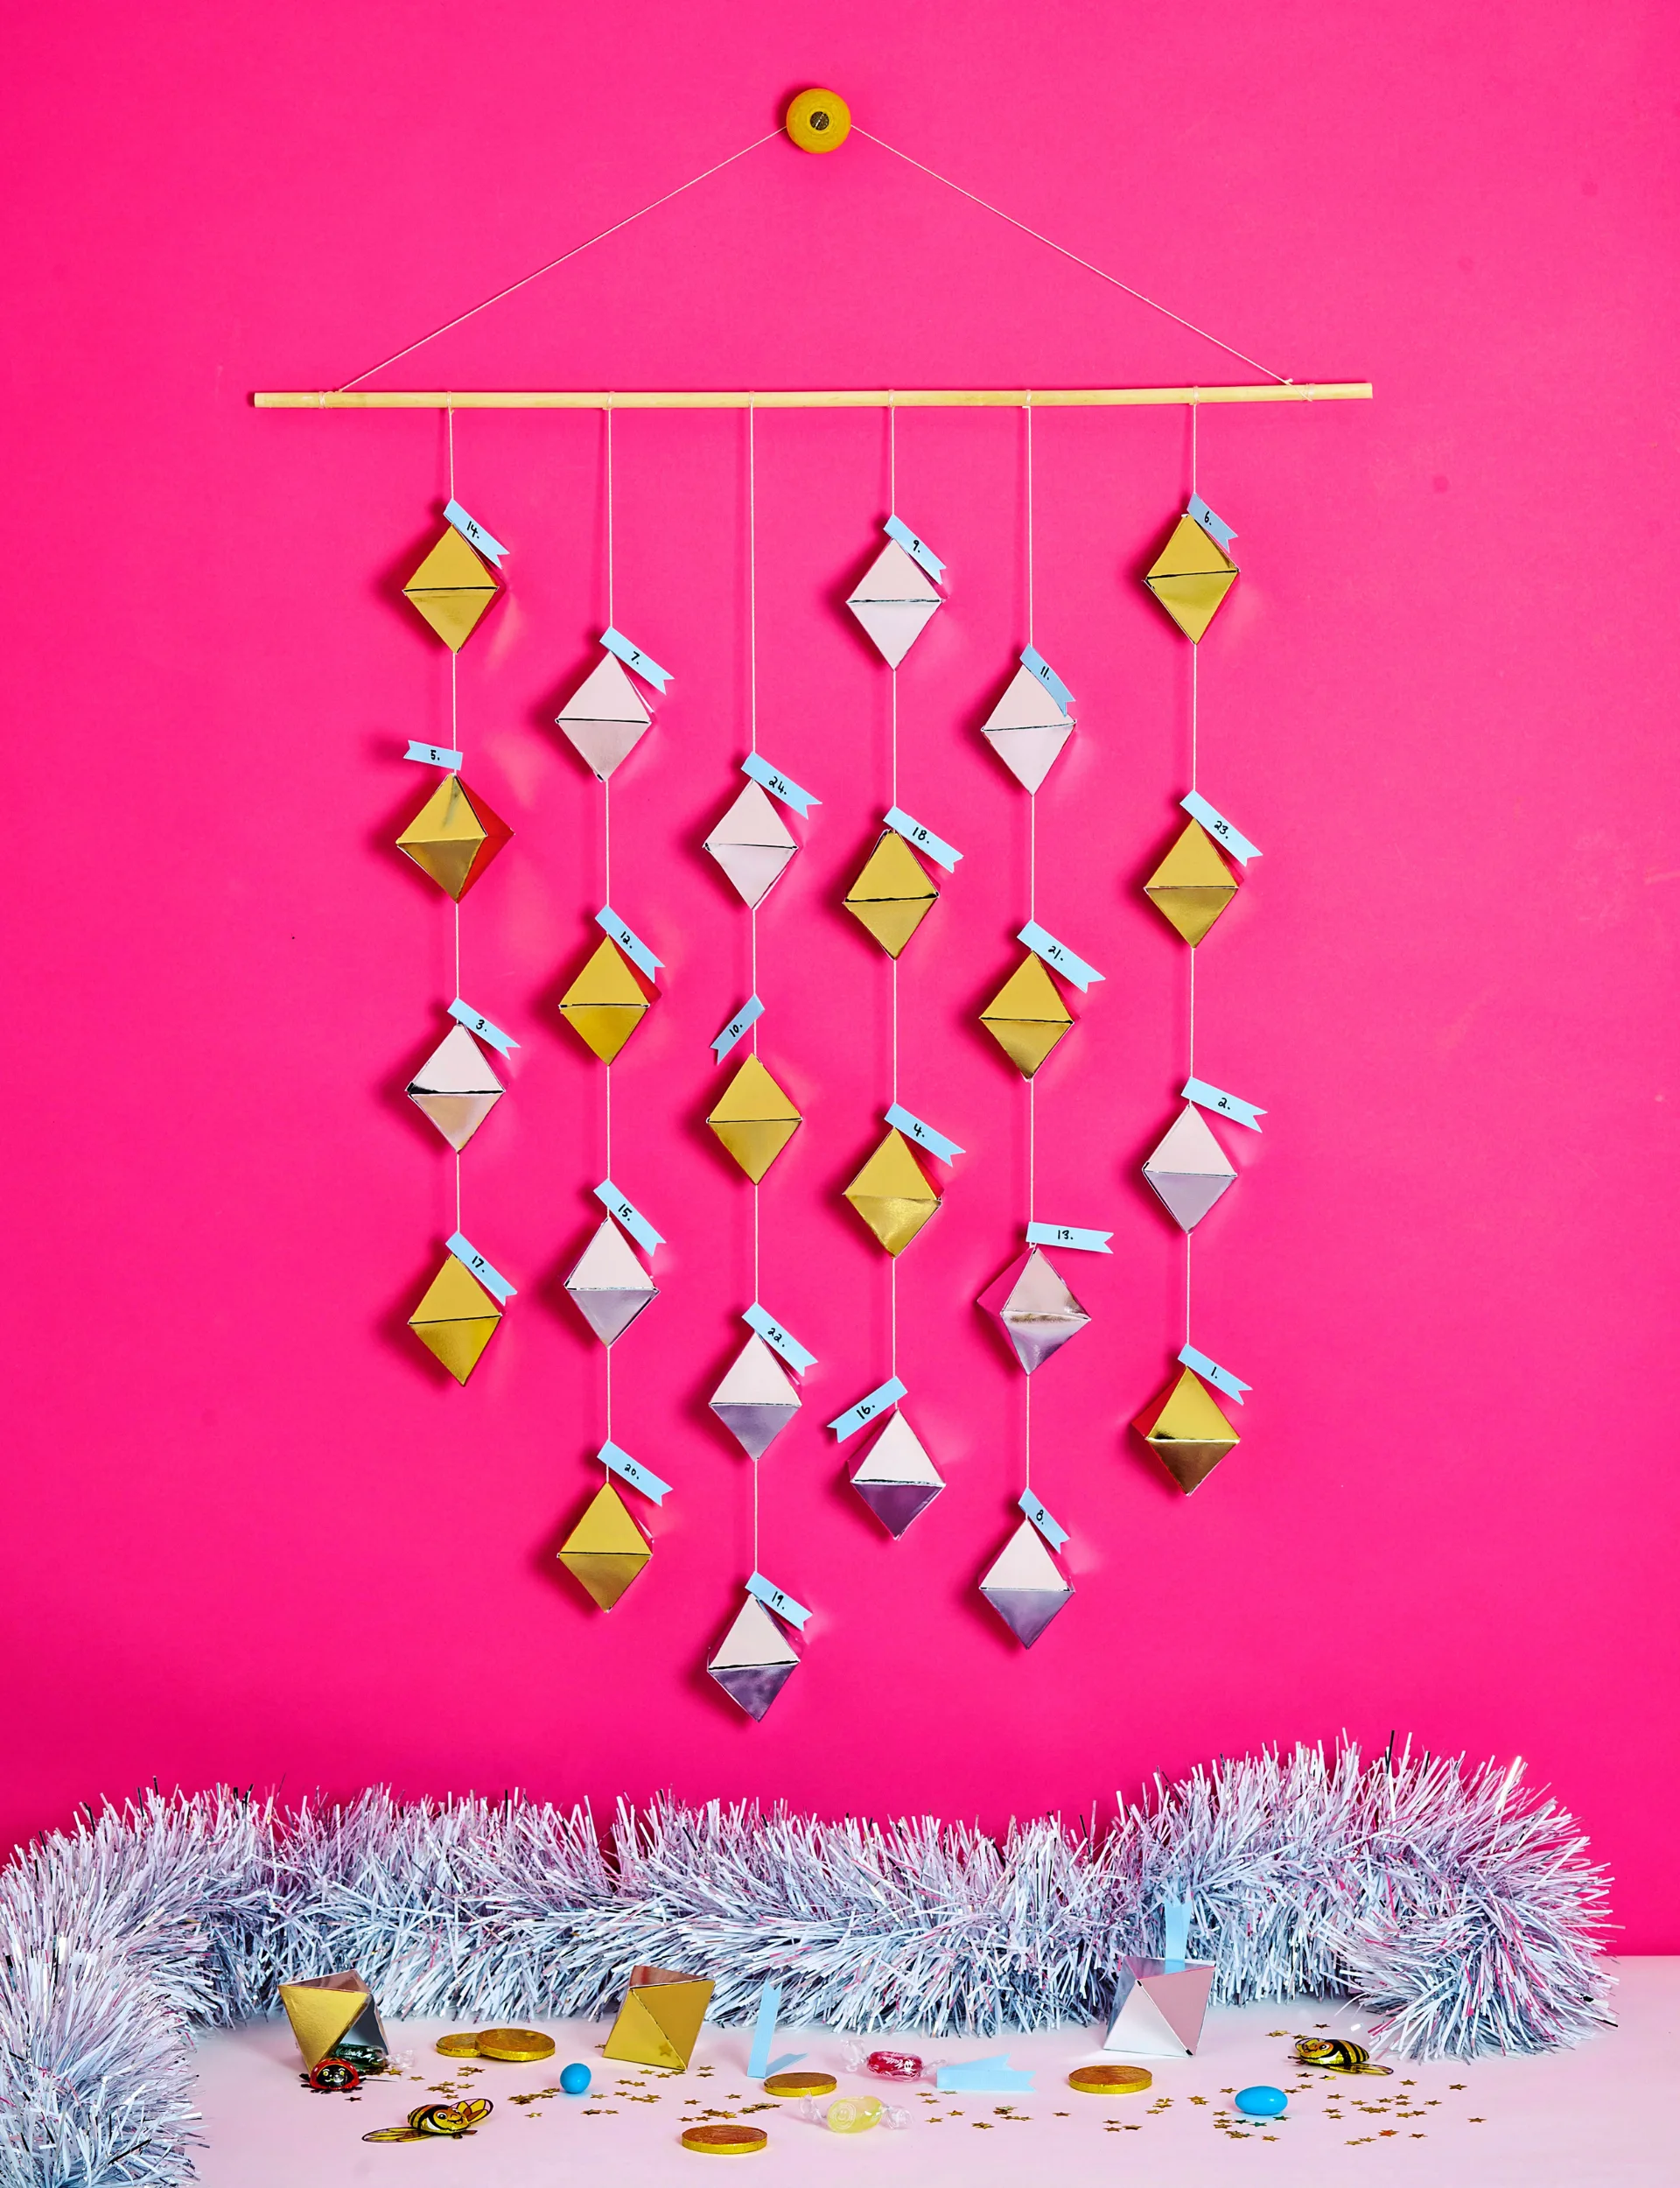
You will need:
- Pen or pencil
- Gold and silver metallic cardboard
- Scissors
- Chocolates, sweets or trinkets
- Double-sided tape or glue
- String
- Balsa wood dowel rod – we used 9mm
- Blue coloured cardboard
Clik here to view.
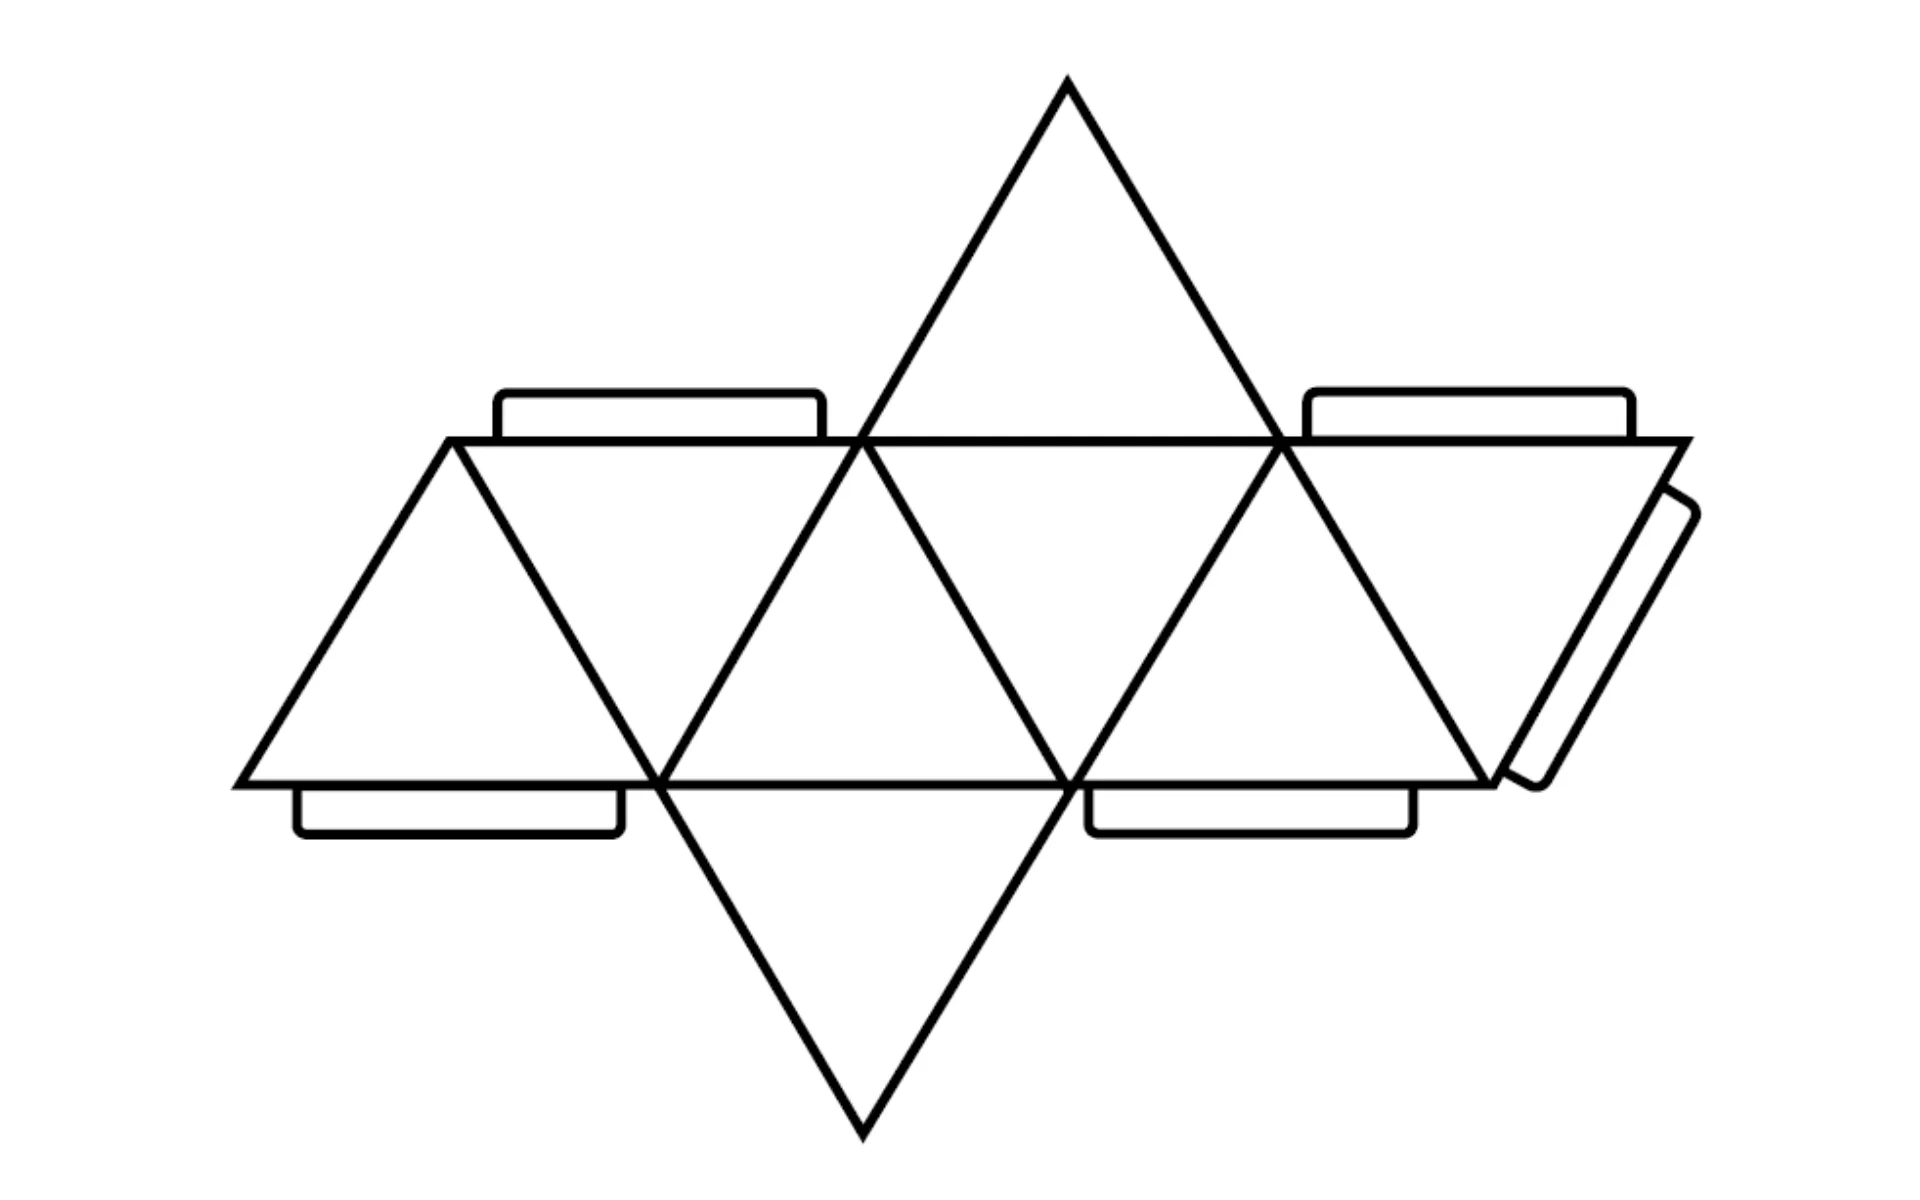
Method:
- Enlarge the template (above) to the desired size using a photocopier or printer. Then, trace the octahedron shape or stick it directly onto a metallic card with sticky tape and cut around the shape. Cut out the remaining 24 shapes, alternating between gold and silver cardboard. Make a fold along the inside lines to form an octahedron.
- Place chocolates and trinkets into shapes and pop them through the string before sealing the shape shut using double-sided tape (or glue) along the tabs. Continue with all shapes.
- Tie a length of four octahedrons onto a piece of balsa wood and tie a knot at the end of each piece of string. Continue until you have used all octahedrons.
- Cut out blue (or the colour of your choice) tags and number each.
- These tags can be any shape – we made ours to look like little flags.
- Hang your advent calendar on the wall – each octahedron can be pulled off the string each day leading to Christmas.
6. Sunburst ornament for the top of the Christmas tree
Clik here to view.
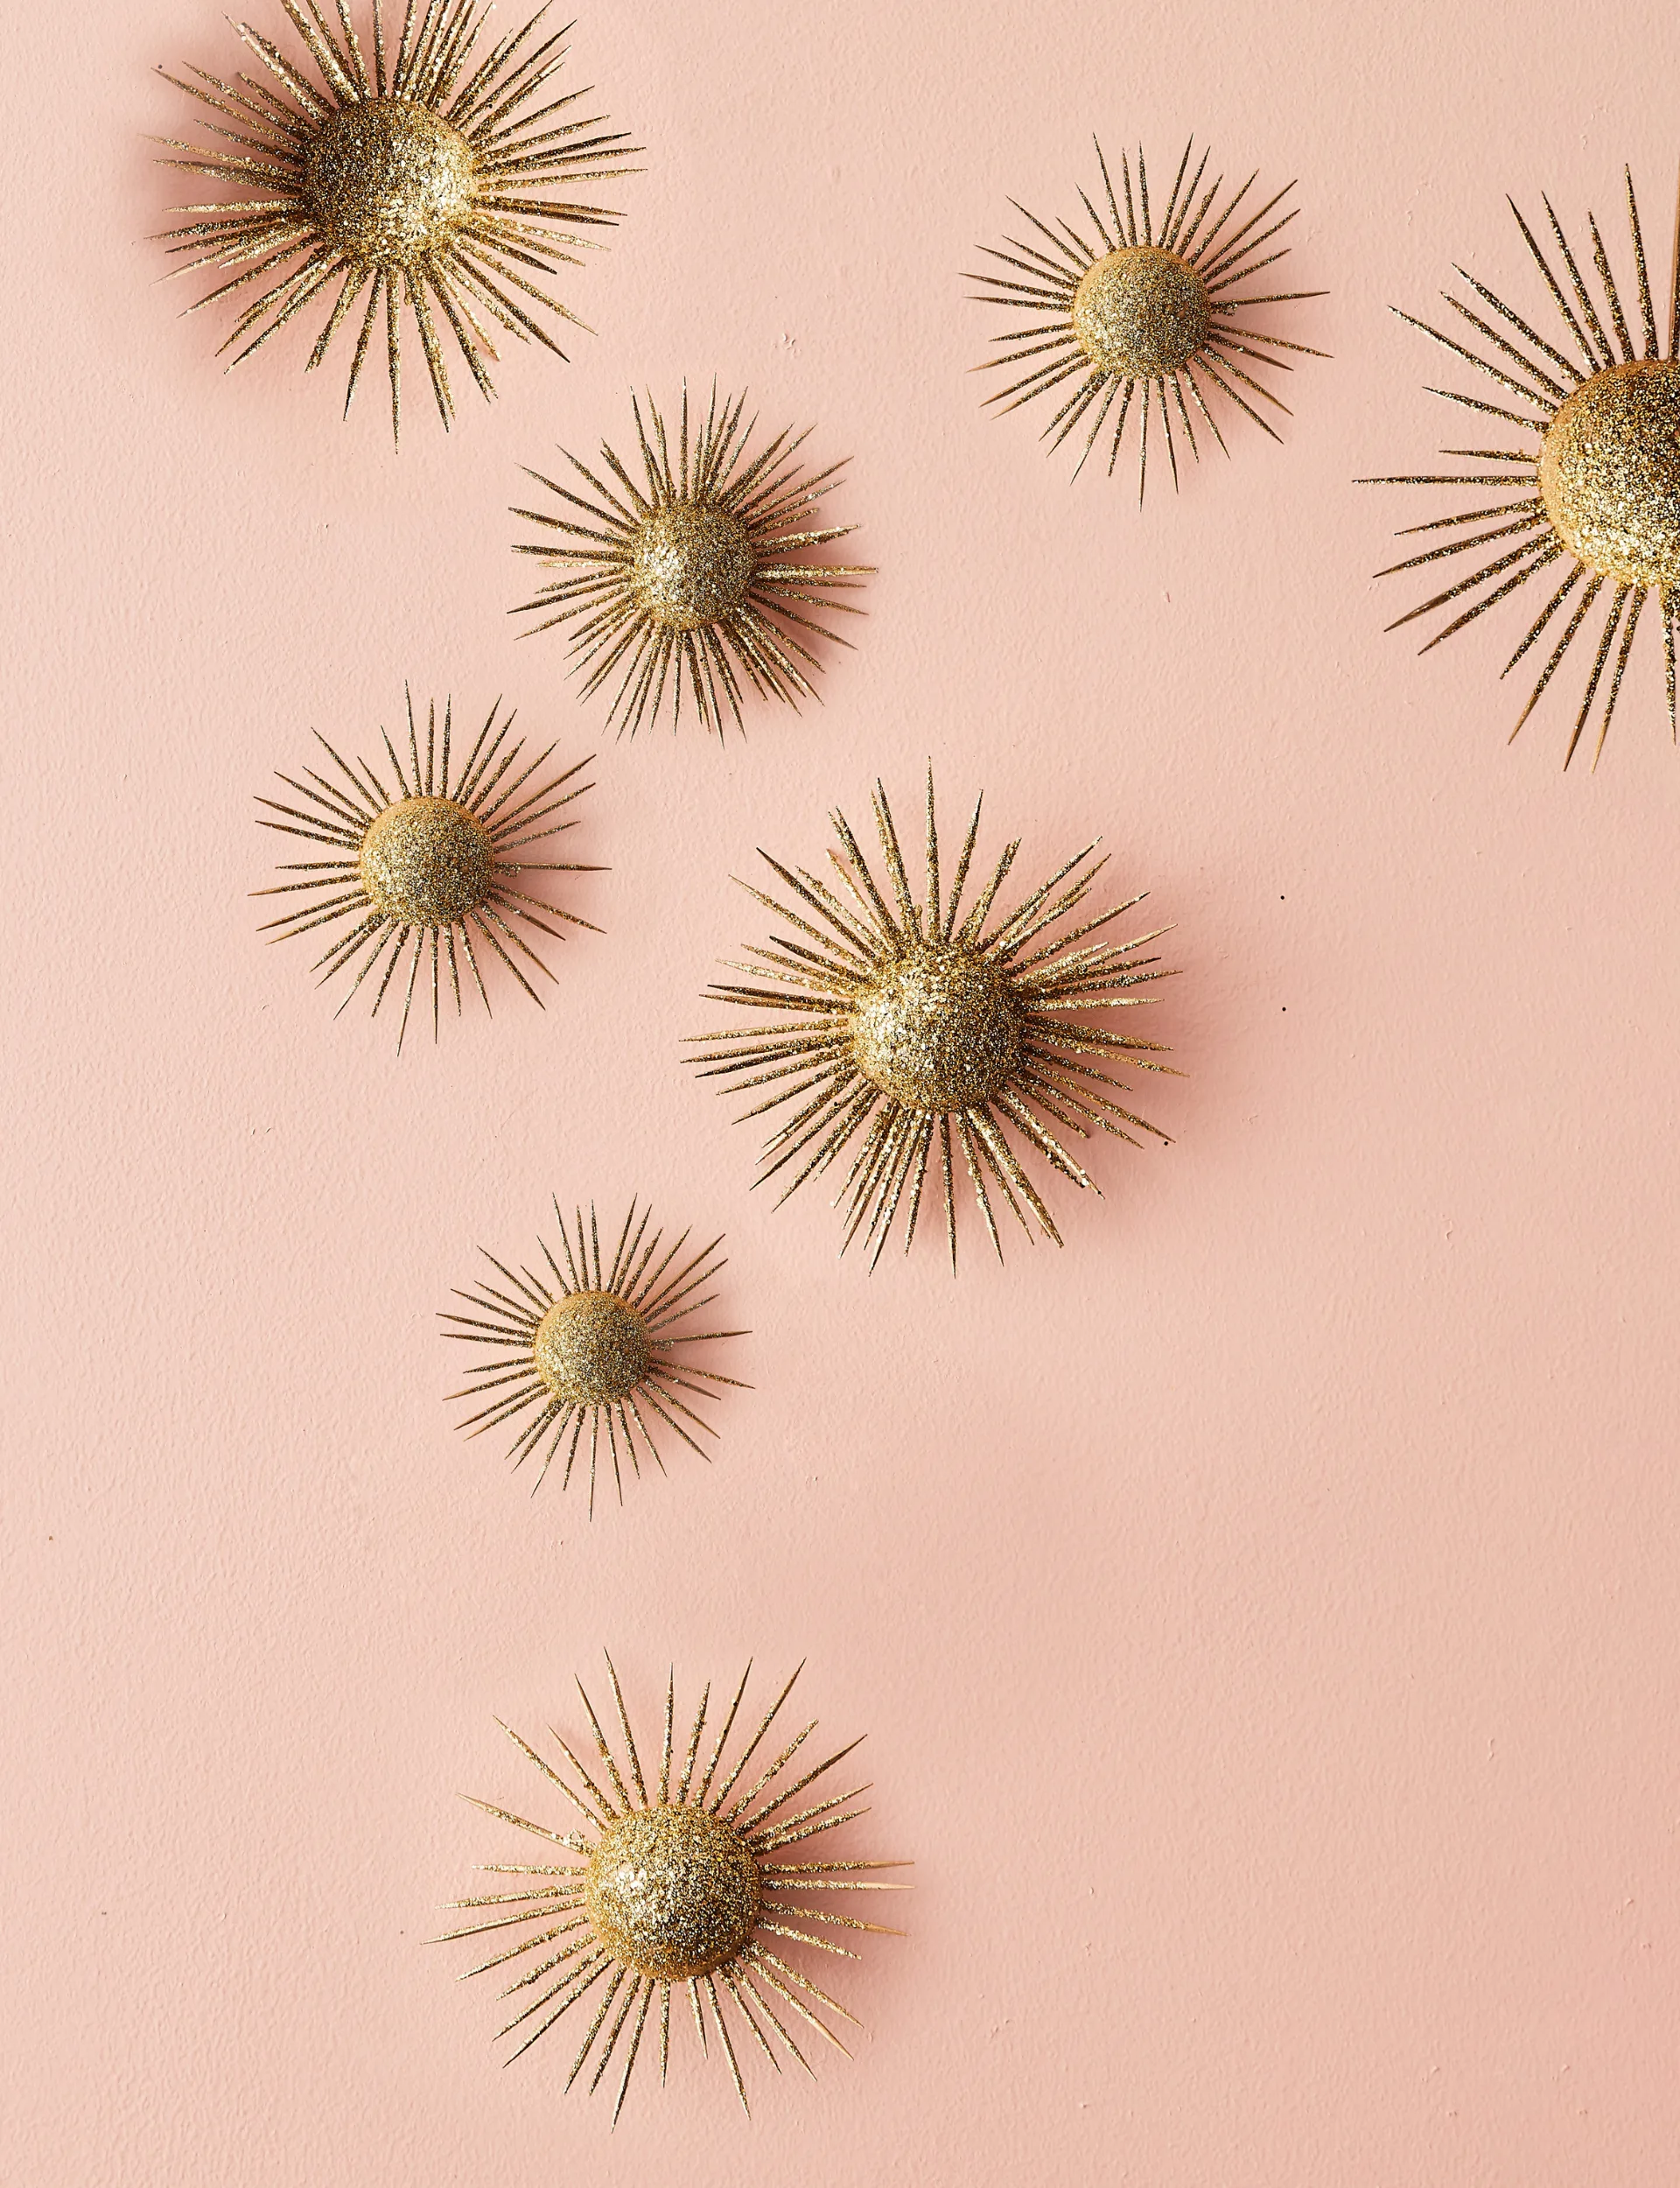
You will need:
- Bamboo skewers
- Strong scissors
- Screw-in O rings
- Polystyrene balls
- Fishing line
- Metallic spray paint
- Glitter spray paint
- Spray adhesive
- Loose glitter
- Ribbon
Method:
- Decide how long you want your longest starburst spikes and cut half the skewers to the desired length (cut the blunt end so the pointy ends are left to stick out).
- Cut the other half of your skewers about a quarter shorter.
- If you want to hang your ornament, screw a small O ring into the foam ball.
- Stick the blunt ends of the shorter skewers into the foam ball, arranging them evenly.
- Stick the blunt ends of the longer skewers into the foam ball, arranging them evenly.
- Thread the fishing line through the O ring and hang in a well-ventilated space (or hold in hand).
- Spray-paint the starburst and allow to dry.
- For extra sparkle, add a coat of glitter spray paint.
- Spray with adhesive glue and sprinkle loose glitter over the top. Allow to dry.
- Replace the fishing line with a clean line or a piece of ribbon. Hang on your tree, against a wall or scatter several as a table centrepiece.
Getting the hang of DIY Christmas crafts? Try making a nutcracker to stand guard this Christmas.
The post 6 DIY Christmas craft ideas to try at home appeared first on Your Home and Garden NZ.